
You can’t strike a tennis ball without strings on your racquet (unless you want to play with the side of your racquet’s frame forever). Furthermore, as you may be aware, tennis strings break easily, necessitating costly stringing if you get it changed at a shop every time. We’re going to show you how to string a tennis racquet today because of this!
Guide : How to string a tennis racquet?
It’s not as simple to learn how to string a tennis racquet as it is to tie your shoes, though. To assist you, you’ll need a tennis stringing machine (which we discuss in more detail here) and a few specialized tools. You can customize the stringing of your racquet by using a stringing machine, which holds the racquet in place while tensioning the strings to your desired length. The majority of stores charge $20 and more to string racquets, with strings ranging in price from $6 to $10. If you break strings frequently, this can add up rapidly. Here is further information about the price of stringing a racquet. You should be able to pay for a simple stringing machine in less than a year by buying the stringing racquets and machine yourself. After that, you’ll just need your savings. Nevertheless, it would not be wise to get your own stringing machine if you play tennis infrequently—that is, once or twice a month or less.
Stringing racquets yourself will save you a ton of time in addition to money and the aggravation of going to a store. It becomes increasingly simpler after that, even though the initial attempts may take longer as you get acclimated to your machine and the actual stringing procedure. While novice stringers may require approximately an hour to become proficient, intermediate and advanced stringers may typically finish the process in less than half an hour. So let’s get started with learning how to string a tennis racquet.
Tennis Racquet Stringing Instructions
Prior to really learning how to string a tennis racquet, there are a few things you’ll need to have on hand. We’ll go over the list quickly and describe the functions of each tool.
Equipment Required:
1. Tennis Stringing Machine:
To string racquets by hand, you will need a stringing machine. It is necessary to retain the racquet frame in place and tension the strings. However, the type of computer you select will only be determined by your requirements. The specifics of choosing a machine are covered in full in the linked article above, but here’s a quick summary:
– Price range: ~$200 for drop weight/basic models to >$2,000 for electronic/deluxe models
– Stand: freestanding (fixed, upright position) or table top (no stand)
– Tension Option: Three options exist for how strings will be tensioned: drop weight (rod/weight), spring/lockout system (manual crank), or automatic (electronic)
– Mounts: The quantity of points of contact that secure a racquet: There are mounting systems with 2, 4, or 6 points available.
– The tensioned strings are held in place by clamps, which can be either permanent or floating and have a swivel or not.
2. Tennis Strings:
You can experiment with different types of strings to find ones that feel and last longer. Some options to consider are:
– natural gut
– artificial gut
– several filaments
– Nylon-Polyester-Kevlar Composites
3. Tennis Racket:
Unless you prefer to practice on an air racquet initially, an unstrung tennis racquet is required (similar to an air guitar).
4. Additional Tools:
– An awl can be used to free clogged grommets and tie knots; it’s essentially a needle that passes through obstructions to allow strings to pass through.
– Pliers can be used to pull strings rather than using your hands, which is helpful for tying knots.
– Clippers, cutters, or diagonal cutters are utilized to cut the strings.
– Before you begin stringing, measure and cut the proper lengths of string using a yard stick or ruler (optional).
Since this is how all tennis racquets can be strung, it is the approach we will be utilizing to thread ours. To accomplish this, cut the entire length of string in half; use one half to string the crosses and the other half to string the mains. When you go from stringing the mains to the crosses, you’ll need to tie a knot. We also tighten strings manually with a crank stringing machine, although your experience may vary based on the kind of machine you own.
Before we start learning how to string a tennis racquet, there are a few things we need to prepare:
1. Measure out the string: Most string packages have around 40 feet of string, which is sufficient for a tennis racquet. However, if you are using a reel for your string (which is more economical), measure out around forty feet and cut it at an angle that will assist you insert the strings through the grommets later on.
2. Make it right: Remove any undesirable kinks from the strings by straightening them out. This reduces the likelihood that the string will break while you are stringing the racquet and makes it simpler to avoid messes once you have started (particularly with natural gut).
3. Cut the entire length in half: The string needs to be divided in half because we’ll be using half of it for the mains and half for the crosses. Place the two ends of the strings together while holding them both. Run the length down to the middle, then snip it at a diagonal angle (this will make it easier to string through the grommets later on).
4. Prepare your racquet: If you haven’t already, snip out the old and broken strings with a sharp knife. Cutting the strings in the middle and working your way outward is easier. To determine whether or not the grommets require replacement, you should also examine them. There shouldn’t be any sharp edges in the grommets for the string to pass through. You’ll be using an awl to unblock any that appear blocked.
5. Adjust the tension rating on your machine: Once more, the specific machine you have will determine this step of the procedure. A manual crank machine with a drop weight will come with a scale to change the tension rating. The display can be used to adjust electronic machines. The majority of players utilize a string tension of between 50 and 60 pounds, but you should experiment to discover the tension that feels right for you. See this graphic for an overview of the benefits and drawbacks of various string tensions. Visit this page for tips on racquet tension and stringing procedures.
Step-by-Step Guide
Step 1: Mounting your Racquet
Mounting your racquet onto your stringing machine should be your first step. But some stringing machines aren’t like the others. To hold the racquet in place, for instance, the mounting system has 2, 4, or 6 contact points. Now that your racquet is on the machine, make sure that every mount, particularly the head and neck, is securely fastened. Verify that the mounts are securely fastened without being so tight as to cause damage to the frame or the racquet.
When installing your racquet, keep in
mind not to block any grommets since this will prevent you from inserting your strings into the blocked holes.
Step 2: Determine Your Point of Origin
You’ll then need to decide where to begin. To accomplish this, count the number of holes in the racquet’s throat by looking at it. You will begin at the throat if your racquet has six holes there; if it has eight holes there, you will begin at the top. Additionally, you should mentally note which holes on the other side of the racquet line up with your starting holes.
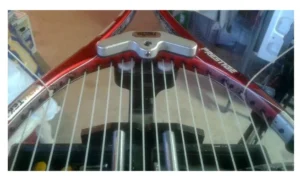
Step 3: Put the Main Strings in Place
You must now take one of the two string segments that you cut and place it into the holes where you started. Make sure there is an equal amount of string on both sides by sliding each end of the string through the holes opposite to one another. Putting the two ends of the string through the holes so that only the tips are visible is the best way to accomplish this. Then, you can tug on both ends of the thread simultaneously to get equal lengths and eliminate the risk of running out of string as you approach the end.
Step 4: Pull the Main Strings
To minimize tension loss, start by clamping one of the main strings at the end where you started. Be sure to clamp as close to the grommet as you can. Keep in mind that you will only use that side with this clamp until you are ready to tie the knot. At this time, you can pull strain on your other main string. Depending on the kind of equipment you have, the way you pull tension on your strings will vary. For drop weights, proper tension requires the rod to be fully parallel to a horizontal, level surface. Every time you tension a string and activate the lockout mechanism, manual machines are turned on. Electronic devices are completely automatic and simply need a button click to release tension. You will lose some strain if the string is not securely fastened.
Step 5: Complete the Principal Strings
As near to the grommet as you can, use a second clamp to hold the string that you just pulled taut in place. Repeat the same with the other side of the string after releasing it from the gripper. Once the proper tension is obtained, insert the string into the gripper, clamp it in place, and repeat the process with the other string until all of your mains are completed.
NOTE: To prevent uneven pressure on the racquet frame, never string more than three mains ahead of the opposite side. Keep an eye out for shared or skipped holes as well. Typically, a dot on the frame designating the skipped hole lets you know the difference. To avoid stringing the racquet incorrectly, it is also important for stringers to familiarize themselves with the racquet string pattern (18×20, 16×19).
Step 6: Secure the Knot
Now that you have completed the mains, tie the knots. Pull the string inside while keeping your clamps securely fastened. Place one end of the string into the closest hole on the outside of your frame that has room. To do this, you might need to use an awl. To tie the knot, pass the end of the string through the loop you just made and down one side of the main string and up the other. To secure the knot, either use pliers or the gripper to push the end of the string in. For a robust double knot, repeat the procedure. You can now finish the other end of the string by repeating the previous steps for one of the primary strings. Release the clamps after the knots are secure, then trim the excess string on both sides being careful not to cut the knots.
Step 7: String the Cross
Now that the main strings are complete, we may proceed to the cross strings. You only need one clamp to keep the tension, so at this point you can move them to accommodate the cross strings if your machine calls for them. First, take the other half of the string that you set aside for the cross strings and place it into one of the shared holes at the top (you can tell by looking for a little larger grommet). Use one of the three starting knot techniques (I like the fishing knot) to tie a starting knot. To get to the other alignment hole, thread the string over and under the mains once your starting knot is set. The simplest way to accomplish this is to place one hand underneath the racquet and the other on top, using both middle fingers to thread the string’s end through the weaving. If the string you wind up on is the opposite of the one you started with—that is, an over will end up as an under, and vice versa—you know you did it correctly.
Step 8: Keep Up the Tension and Crosses
Proceed to the second cross after pulling the entire string through, being careful to adjust the string as you go to avoid kinks. For the second cross, you will begin with an over if the first cross finished with the string under the main. Essentially, you will use an over for each additional cross until you finish if you began with an over for the first cross.
After the initial cross, you can either tighten the string or wait to tension them all at once after you’ve completed a couple. If you decide to tighten the string after the first cross, simply place the string into the gripper, adjust the tension, and clamp it as tightly as you can against the grommet. But before I extract them, I like to weave a couple of crosses—no more than three. I leave a loop on the outside of the frame after making three crossings; this loop is long enough to fit into my gripper to tension the first two crosses before clamping it.
Step 9: Complete the Cross Stitches
After the initial cross strings have been tightened, proceed to string each cross individually, following the same procedure as before. It is simpler, though, to weave a cross first, then tension the one before it by leaving a loop that fits into the gripper. To finish, leave a loop, pull tension on the preceding cross, enter the string through the appropriate hole, weave the string over and under the mains, and clamp it off. There will be less string at the end, which makes it more difficult to pull. In this situation, use pliers.
Step 10: Knot the Thing (Revised)
The finish line is in sight! You must tie a knot now that your crosses are complete. This knot closely resembles the one we designed for the principal strings. All you have to do is locate the nearest opening that can accommodate two strings. Use your awl to enlarge the hole, but be careful not to harm the racquet’s frame or strings in the process. Put the end of the cross string through and follow the same procedure as previously, inserting the string through the loop you just made and going down one side of the cross and up the other. Using your pliers, tighten it until it’s smooth and secure. Repeat to create a strong double knot.
Step 11: Take the Racquet Off
The last step is to take the racquet off and remove the clamp. Make sure there are no kinks, missing weaves, or racquet damage by closely inspecting your work. You can trim the excess thread after everything appears to be in order, but be careful not to cut the knot in your enthusiasm.

You just acquired the skill of stringing a tennis racquet! Congratulations! You deserve to wallow in the glory of your newly acquired knowledge, so take some time to do so!